皆さん、こんにちは。管理人です。このシリーズ「Laravel で電子掲示板を作ろう」では、その名の通り、Laravel を用いて電子掲示板を作っていこうと思っています。今回は第 2 回目となります。
投稿ボタンをクリックしたあとのリダイレクト先の変更
これはお好みにもよりますが、新しく記事を作成したあと、その新しい記事にリダイレクトされるようにしたいと思います。app/Http/Controllers/PostController.php の2つの行を次のように変更します。
<?php

namespace App\Http\Controllers;

use Illuminate\Http\Request;
use App\Models\Post;
use Auth;

class PostController extends Controller
{
    public function store(Request $request)
    {
        $data = $request->all(); // フォームで送信されたデータをすべてとってきます

        $post_id = Post::insertGetId([ // 変更後
            'user_id' => Auth::id(), // ログイン中のユーザーの ID を格納します
            'title' => $data['title'], // 入力された文字列を格納します
            'content' => $data['content'], // 入力された文字列を格納します
        ]);

        return redirect()->route('post', compact('post_id')); // 変更後
    }

    public function post($post_id)
    {
        $post = Post::where('id', $post_id)->first();
        if (is_null($post)) {
            abort(404);
        }
        return view('post', compact('post'));
    }
}
これで、新しい記事を書いて「投稿」ボタンをクリックすると、その記事に飛ぶようになるはずです。
ダッシュボードにログイン中のユーザーが書いた記事の一覧を表示させる
続いて、ダッシュボードにログイン中のユーザーが書いた記事の一覧を表示させようと思います。まず、routes/web.php の
    Route::get('/dashboard', function () {
        return view('dashboard');
    })->name('dashboard');
となっているところを削除して、
Route::get('/dashboard', [PostController::class, 'show'])->name('dashboard');として下さい。すると、
<?php

use Illuminate\Support\Facades\Route;
use App\Http\Controllers\PostController;

/*
|--------------------------------------------------------------------------
| Web Routes
|--------------------------------------------------------------------------
|
| Here is where you can register web routes for your application. These
| routes are loaded by the RouteServiceProvider within a group which
| contains the "web" middleware group. Now create something great!
|
*/

Route::get('/', function () {
    return view('welcome');
});
Route::get('/post/{post_id}', [PostController::class, 'post'])->name('post');

Route::middleware([
    'auth:sanctum',
    config('jetstream.auth_session'),
    'verified'
])->group(function () {
    Route::get('/dashboard', [PostController::class, 'show'])->name('dashboard'); // 変更後
    Route::get('/create', function () {
        return view('create');
    })->name('create');
    Route::post('/store', [PostController::class, 'store'])->name('store');
});
となるかと思います。
続いて、次のようにして、PostController に show アクションを追加します。
<?php

namespace App\Http\Controllers;

use Illuminate\Http\Request;
use App\Models\Post;
use Auth;

class PostController extends Controller
{
    public function store(Request $request)
    {
        $data = $request->all(); // フォームで送信されたデータをすべてとってきます

        $post_id = Post::insertGetId([
            'user_id' => Auth::id(), // ログイン中のユーザーの ID を格納します
            'title' => $data['title'], // 入力された文字列を格納します
            'content' => $data['content'], // 入力された文字列を格納します
        ]);

        return redirect()->route('post', compact('post_id'));
    }

    public function post($post_id)
    {
        $post = Post::where('id', $post_id)->first();
        if (is_null($post)) {
            abort(404);
        }
        return view('post', compact('post'));
    }

    /**
     * このアクションを追加
     */
    public function show()
    {
        $posts = Post::where('user_id', Auth::id())->latest('updated_at')->get();
        return view('dashboard', compact('posts'));
    }
}
この show アクションの中身について少し解説します。まず Post::where('user_id', Auth::id()) でデータベースの posts テーブルの中から、user_id が ログイン中のユーザーの id であるようなレコード(記事)全体をとってきます。そして、->latest('updated_at') でレコードの更新日時が新しい順にレコードを並び替えます。それを ->get() して、そのようなレコードの全体が変数 $posts(配列)に代入されます。そして、次の行の return view('dashboard', compact('posts')); で、変数 $posts をビューに渡しています。そうすることによって、dashboard というビューで変数 $posts が使えるようになります。
次に、resources/views/dashboard.blade.php を次のように書き換えます。
<x-app-layout>
    <x-slot name="header">
        <h2 class="font-semibold text-xl text-gray-800 leading-tight">
            {{ __('Dashboard') }}(あなたの記事一覧)
        </h2>
    </x-slot>

    <div class="py-12">
        <div class="max-w-7xl mx-auto sm:px-6 lg:px-8">
            <table class="table-auto border-solid border-black border-2" style="border-collapse: separate; border-spacing: 0">
                <tr class="bg-green-300">
                    <th class="border border-black px-4 py-2">タイトル</th>
                    <th class="border border-black px-4 py-2">内容</th>
                    <th class="border border-black px-4 py-2">更新日時</th>
                </tr>
                @foreach ($posts as $post)
                    <tr>
                        <td class="border border-black px-4 py-2 text-blue-500">
                            <a href="{{ route('post', $post['id']) }}">{{ $post['title'] }}</a>
                        </td>
                        <td class="border border-black px-4 py-2">{{ Str::limit($post['content'], 60, '…' ) }}</td>
                        <td class="border border-black px-4 py-2">{{ $post['updated_at'] }}</td>
                    </tr>
                @endforeach
            </table>
        </div>
    </div>
</x-app-layout>
ここで、ターミナルで npm run dev が実行中なのを確認してからブラウザでダッシュボードにアクセスすると、ログイン中のユーザーが作成した記事が一覧で表示されているかと思います。
-1024x538.png)
記事の編集機能の追加
続いては、作成された記事を編集できるようにしていきたいと思います。routes/web.php に二行を追加して次のようにして下さい。
<?php

use Illuminate\Support\Facades\Route;
use App\Http\Controllers\PostController;

/*
|--------------------------------------------------------------------------
| Web Routes
|--------------------------------------------------------------------------
|
| Here is where you can register web routes for your application. These
| routes are loaded by the RouteServiceProvider within a group which
| contains the "web" middleware group. Now create something great!
|
*/

Route::get('/', function () {
    return view('welcome');
});
Route::get('/post/{post_id}', [PostController::class, 'post'])->name('post');

Route::middleware([
    'auth:sanctum',
    config('jetstream.auth_session'),
    'verified'
])->group(function () {
    Route::get('/dashboard', [PostController::class, 'show'])->name('dashboard');
    Route::get('/create', function () {
        return view('create');
    })->name('create');
    Route::post('/store', [PostController::class, 'store'])->name('store');
    Route::get('/edit/{post_id}', [PostController::class, 'edit'])->name('edit'); // 追加
    Route::post('/update/{post_id}', [PostController::class, 'update'])->name('update'); // 追加
});
続いて、PostController に edit アクションを追加して次のようにします。
<?php

namespace App\Http\Controllers;

use Illuminate\Http\Request;
use App\Models\Post;
use Auth;

class PostController extends Controller
{
    public function store(Request $request)
    {
        $data = $request->all(); // フォームで送信されたデータをすべてとってきます

        $post_id = Post::insertGetId([
            'user_id' => Auth::id(), // ログイン中のユーザーの ID を格納します
            'title' => $data['title'], // 入力された文字列を格納します
            'content' => $data['content'], // 入力された文字列を格納します
        ]);

        return redirect()->route('post', compact('post_id'));
    }

    public function post($post_id)
    {
        $post = Post::where('id', $post_id)->first();
        if (is_null($post)) {
            abort(404);
        }
        return view('post', compact('post'));
    }

    public function show()
    {
        $posts = Post::where('user_id', Auth::id())->latest('updated_at')->get();
        return view('dashboard', compact('posts'));
    }

    /**
     * このアクションを追加
     */
    public function edit($post_id)
    {
        $post = Post::where('id', $post_id)
                    ->where('user_id', Auth::id()) // ログイン中のユーザーが編集しようとしていることを確認
                    ->first();

        return view('edit', compact('post'));
    }
}
続いて、ファイル resources/views/edit.blade.php を作成して内容は次のようにします。
<x-app-layout>
    <x-slot name="header">
        <h2 class="font-semibold text-xl text-gray-800 leading-tight">
            記事の編集
        </h2>
    </x-slot>

    <div class="py-12">
        <div class="max-w-2xl px-6 lg:px-8">
            <form class="grid grid-cols-1 gap-6" method='POST' action="{{ route('update', $post['id']) }}" enctype="multipart/form-data">
                @csrf
                <label class="block">
                    <span class="text-gray-700">タイトル</span>
                    <input name="title" type="text" class="mt-1 block w-full rounded-md shadow-sm" value="{{ $post['title'] }}">
                </label>
                <label class="block">
                    <span class="text-gray-700">内容</span>
                    <textarea class="block w-full mt-1 rounded-md" name="content" rows="5">{{ $post['content'] }}</textarea>
                </label>
                <button type='submit' class="w-20 bg-blue-600 hover:bg-blue-500 text-white rounded px-4 py-2">更新</button>
            </form>
        </div>
    </div>
</x-app-layout>
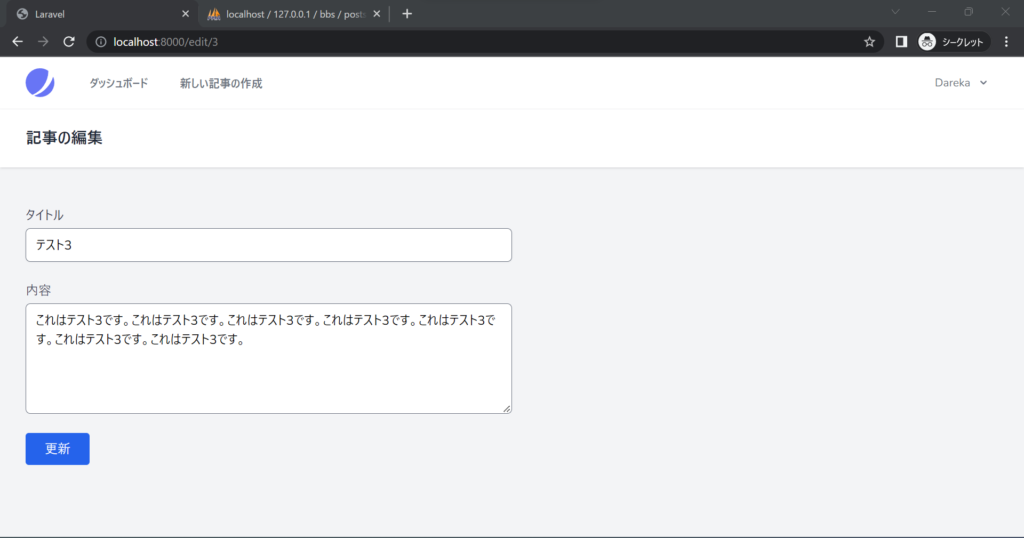
http://localhost:8000/edit/*
(ただし * は数字で、該当する記事の id)にアクセスしてみましょう。この画像のように、タイトルや内容が埋まった状態で表示されると思います。
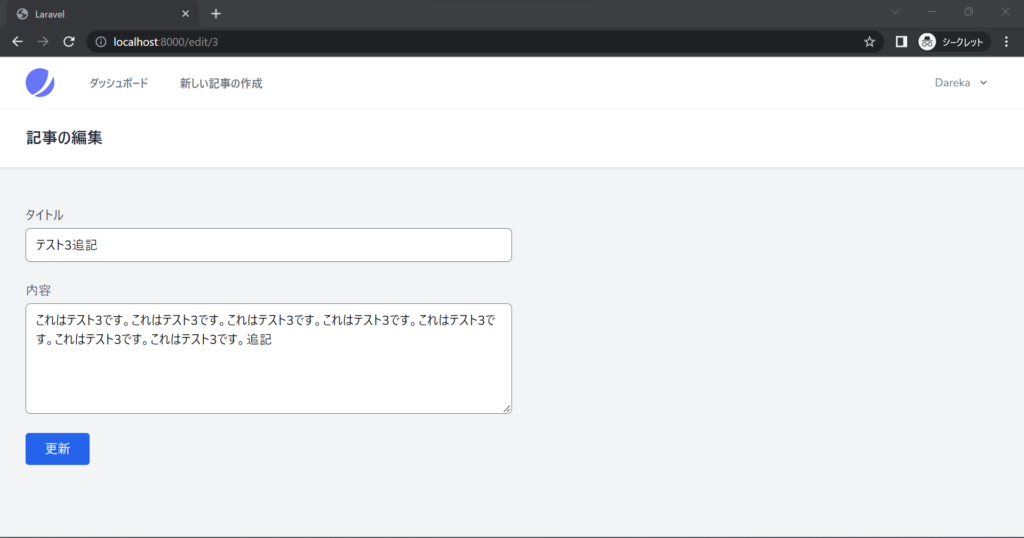
そして、今ここで記事に編集を加えて更新ボタンをクリックしたとしてもエラーになるので、PostController の update メソッドを次のように実装しましょう。
<?php
namespace App\Http\Controllers;
use Illuminate\Http\Request;
use App\Models\Post;
use Auth;
class PostController extends Controller
{
public function store(Request $request)
{
$data = $request->all(); // フォームで送信されたデータをすべてとってきます
$post_id = Post::insertGetId([
'user_id' => Auth::id(), // ログイン中のユーザーの ID を格納します
'title' => $data['title'], // 入力された文字列を格納します
'content' => $data['content'], // 入力された文字列を格納します
]);
return redirect()->route('post', compact('post_id'));
}
public function post($post_id)
{
$post = Post::where('id', $post_id)->first();
if (is_null($post)) {
abort(404);
}
return view('post', compact('post'));
}
public function show()
{
$posts = Post::where('user_id', Auth::id())->latest('updated_at')->get();
return view('dashboard', compact('posts'));
}
public function edit($post_id)
{
$post = Post::where('id', $post_id)
->where('user_id', Auth::id()) // ログイン中のユーザーが編集しようとしていることを確認
->first();
return view('edit', compact('post'));
}
/**
* このアクションを追加
*/
public function update(Request $request, $post_id)
{
$data = $request->all();
$query = Post::where('id', $post_id)->where('user_id', Auth::id());
// ログイン中のユーザーが記事を更新しようとしていることを確認
if ($query->exists()) {
$query->update(['title' => $data['title'],
'content' => $data['content']]);
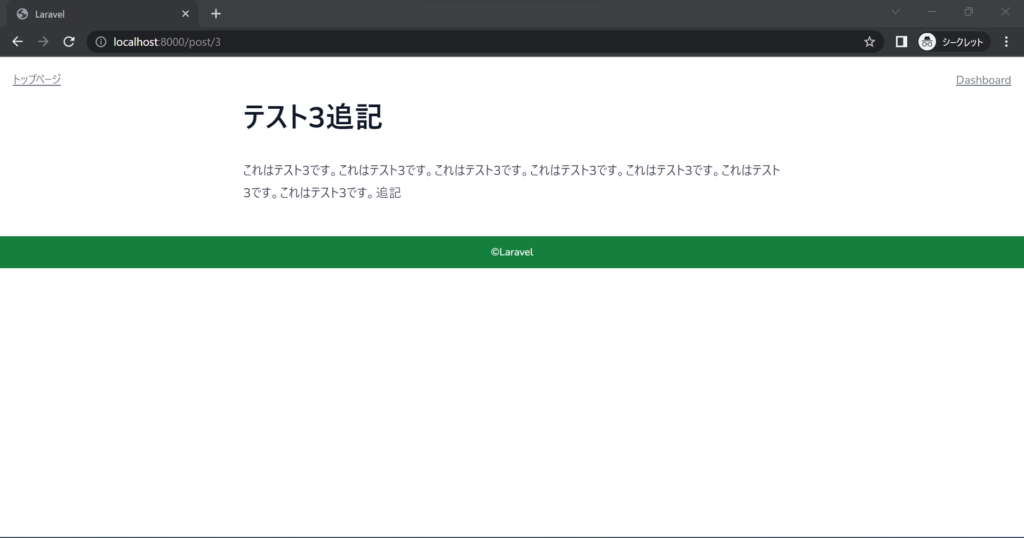
return redirect()->route('post', compact('post_id')); // 該当の記事にリダイレクト
} else {
abort(500); // サーバーエラー
}
}
}
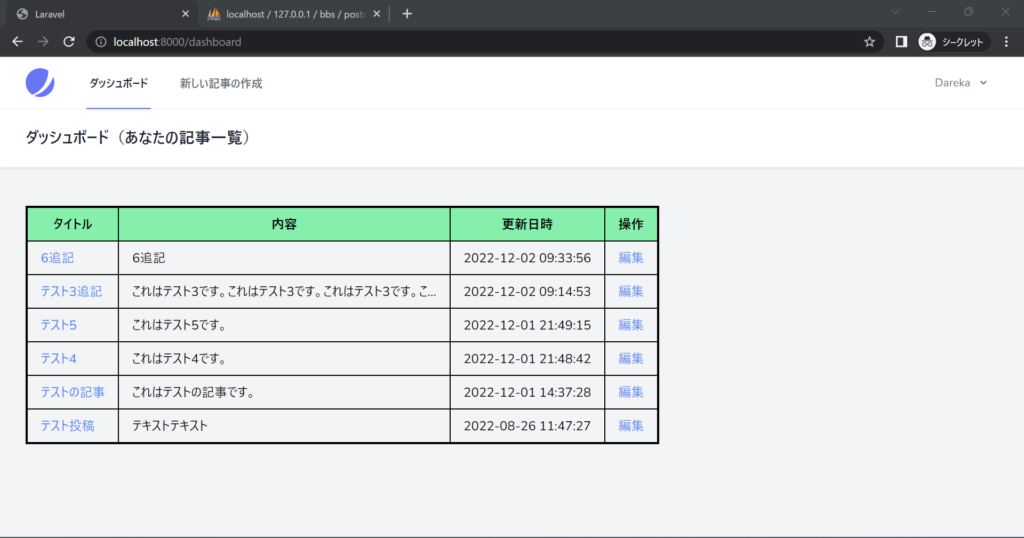
最後に、毎回 http://localhost:8000/edit/* と直打ちするのは面倒なので、ダッシュボードを少し修正して http://localhost:8000/edit/* へのリンクを貼っておきましょう。
<x-app-layout>
    <x-slot name="header">
        <h2 class="font-semibold text-xl text-gray-800 leading-tight">
            {{ __('Dashboard') }}(あなたの記事一覧)
        </h2>
    </x-slot>

    <div class="py-12">
        <div class="max-w-7xl mx-auto sm:px-6 lg:px-8">
            <table class="table-auto border-solid border-black border-2" style="border-collapse: separate; border-spacing: 0">
                <tr class="bg-green-300">
                    <th class="border border-black px-4 py-2">タイトル</th>
                    <th class="border border-black px-4 py-2">内容</th>
                    <th class="border border-black px-4 py-2">更新日時</th>
                    <th class="border border-black px-4 py-2">操作</th> <!-- 追記 -->
                </tr>
                @foreach ($posts as $post)
                    <tr>
                        <td class="border border-black px-4 py-2 text-blue-500">
                            <a href="{{ route('post', $post['id']) }}">{{ $post['title'] }}</a>
                        </td>
                        <td class="border border-black px-4 py-2">{{ Str::limit($post['content'], 60, '…' ) }}</td>
                        <td class="border border-black px-4 py-2">{{ $post['updated_at'] }}</td>
                        <td class="border border-black px-4 py-2 text-blue-500"><a href="{{ route('edit', $post['id']) }}">編集</a></td> <!-- 追記 -->
                    </tr>
                @endforeach
            </table>
        </div>
    </div>
</x-app-layout>

コメント